Let’s face it, remote access has become the name of the game in today's tech-driven world. Whether you’re a tech enthusiast, a remote worker, or just someone who loves tinkering with gadgets, TeamViewer Raspberry Pi is your golden ticket to unlocking endless possibilities. Imagine controlling your Raspberry Pi from anywhere in the world—sounds like magic, right? Well, it’s not magic; it’s TeamViewer on Raspberry Pi, and we’re here to break it down for you step by step.
This isn’t just another tech tutorial; it’s a deep dive into how you can harness the power of TeamViewer on Raspberry Pi. From setting it up to troubleshooting common issues, we’ve got you covered. So, buckle up because we’re about to take you on a ride through the world of remote access like never before.
Now, before we dive into the nitty-gritty, let’s get one thing straight: TeamViewer Raspberry Pi isn’t just for techies. It’s for anyone who wants to make their life easier, more efficient, and a whole lot cooler. So, whether you’re setting up a home automation system or just want to access your files remotely, this guide is your go-to resource.
Read also:Mckinley Richardson Onlyfans The Ultimate Guide To Her Rise And Content
Understanding TeamViewer Raspberry Pi: What’s the Fuss About?
So, what exactly is TeamViewer Raspberry Pi, and why should you care? Well, my friend, TeamViewer is a powerful software that allows you to remotely access and control computers and devices from anywhere. When you pair it with Raspberry Pi, you’ve got yourself a compact, affordable powerhouse that can handle everything from media streaming to IoT projects.
Here’s the deal: Raspberry Pi is more than just a tiny computer; it’s a versatile platform that can be customized to fit your needs. With TeamViewer, you can access your Raspberry Pi remotely, which means you don’t have to be physically present to manage your projects. This opens up a world of possibilities, especially for those who love tinkering with gadgets.
Why Choose TeamViewer for Raspberry Pi?
Now, you might be wondering why TeamViewer is the go-to choice for Raspberry Pi users. Here’s the lowdown:
- Easy Setup: TeamViewer is notoriously easy to set up, even for beginners. Just follow the steps, and you’re good to go.
- Reliability: With TeamViewer, you can count on stable connections, even over long distances. Say goodbye to dropped connections and hello to seamless remote access.
- Security: Security is a big deal, and TeamViewer doesn’t mess around. With end-to-end encryption, you can rest assured that your data is safe.
- Multi-Platform Support: Whether you’re using a PC, Mac, or mobile device, TeamViewer has got you covered. You can access your Raspberry Pi from virtually any device.
Setting Up TeamViewer on Raspberry Pi: A Step-by-Step Guide
Alright, let’s get our hands dirty and set up TeamViewer on Raspberry Pi. Don’t worry; it’s easier than it sounds. Follow these steps, and you’ll be up and running in no time.
Step 1: Preparing Your Raspberry Pi
Before you install TeamViewer, make sure your Raspberry Pi is up to date. Here’s how:
- Boot up your Raspberry Pi and open the terminal.
- Type in
sudo apt updateand hit enter. - Next, type
sudo apt upgradeto ensure all your software is updated.
Trust me, this step is crucial. A well-maintained system ensures smooth sailing when you install TeamViewer.
Read also:Subhashree Viral Mms Video The Untold Story And Facts You Need To Know
Step 2: Installing TeamViewer
Now, let’s install TeamViewer. Here’s what you need to do:
- Head over to the TeamViewer website and download the Raspberry Pi version.
- Once the download is complete, open the terminal and navigate to the directory where the file is saved.
- Run the installation command:
sudo dpkg -i teamviewer_*.deb. - After the installation is complete, start TeamViewer by typing
teamviewerin the terminal.
Voila! You’ve successfully installed TeamViewer on your Raspberry Pi. Now, let’s move on to the next step.
Connecting to Your Raspberry Pi with TeamViewer
So, you’ve installed TeamViewer on your Raspberry Pi. Now, it’s time to connect to it from another device. Here’s how:
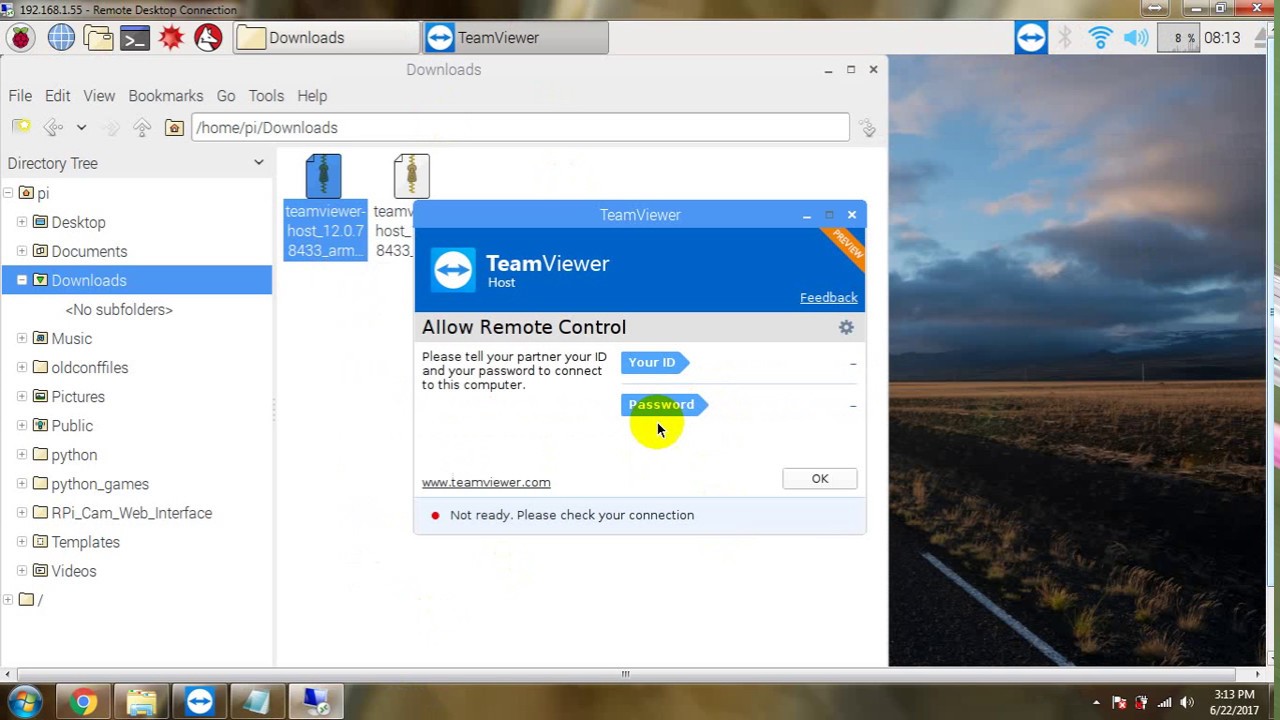
Step 1: Getting Your TeamViewer ID
When you first launch TeamViewer on your Raspberry Pi, it will generate a unique ID. This ID is what you’ll use to connect to your Raspberry Pi from another device. Make sure to note it down somewhere safe.
Step 2: Connecting from Another Device
Here’s how you connect to your Raspberry Pi from another device:
- Download and install TeamViewer on the device you’ll be using to connect.
- Open TeamViewer and enter the ID of your Raspberry Pi.
- Click on "Connect" and enter the password when prompted.
And just like that, you’re connected to your Raspberry Pi. Pretty cool, huh?
Troubleshooting Common Issues
Let’s face it; things don’t always go as planned. Here are some common issues you might encounter when using TeamViewer on Raspberry Pi and how to fix them.
Issue 1: Connection Problems
If you’re having trouble connecting to your Raspberry Pi, here’s what you can do:
- Make sure both devices are connected to the internet.
- Check if the TeamViewer service is running on your Raspberry Pi.
- Restart both TeamViewer and your Raspberry Pi to see if that resolves the issue.
Issue 2: Slow Performance
If you notice slow performance, try the following:
- Lower the screen resolution on your Raspberry Pi.
- Disable unnecessary background processes.
- Consider upgrading your internet connection for better speeds.
Remember, a little troubleshooting can go a long way in ensuring a smooth experience.
Maximizing Your TeamViewer Raspberry Pi Setup
Now that you’ve got TeamViewer up and running, let’s talk about how you can maximize its potential. Here are a few ideas:
Idea 1: Home Automation
Use your Raspberry Pi with TeamViewer to set up a home automation system. Control your lights, thermostat, and even your security cameras from anywhere in the world.
Idea 2: Media Streaming
Turn your Raspberry Pi into a media server and access your favorite movies and music from any device using TeamViewer.
Idea 3: IoT Projects
With TeamViewer, you can remotely manage your IoT projects, making it easier to monitor and control your devices from afar.
Security Best Practices for TeamViewer Raspberry Pi
Security should always be a top priority, especially when dealing with remote access. Here are some best practices to keep your TeamViewer setup secure:
- Use Strong Passwords: Make sure your TeamViewer password is strong and unique.
- Enable Two-Factor Authentication: This adds an extra layer of security to your account.
- Regularly Update Software: Keep your Raspberry Pi and TeamViewer software updated to protect against vulnerabilities.
TeamViewer Raspberry Pi: The Future of Remote Access
As technology continues to evolve, the possibilities for TeamViewer Raspberry Pi are endless. From smart homes to industrial applications, the potential is truly limitless.
Trend 1: IoT Integration
With the rise of IoT, integrating TeamViewer with Raspberry Pi projects is becoming increasingly popular. This allows for remote monitoring and control of IoT devices, making it easier to manage complex systems.
Trend 2: Cloud-Based Solutions
Cloud-based solutions are becoming the norm, and TeamViewer is no exception. By leveraging cloud technology, users can enjoy faster and more reliable connections.
Conclusion: Unlock the Power of TeamViewer Raspberry Pi
There you have it, folks. TeamViewer Raspberry Pi is more than just a tool; it’s a gateway to a world of possibilities. From setting it up to maximizing its potential, we’ve covered it all. Remember, the key to success is understanding the basics and building from there.
So, what are you waiting for? Dive into the world of remote access and take your Raspberry Pi projects to the next level. And don’t forget to share your experiences with us in the comments below. Who knows? You might just inspire someone else to join the TeamViewer Raspberry Pi revolution!
Table of Contents
- Understanding TeamViewer Raspberry Pi
- Why Choose TeamViewer for Raspberry Pi?
- Setting Up TeamViewer on Raspberry Pi
- Connecting to Your Raspberry Pi with TeamViewer
- Troubleshooting Common Issues
- Maximizing Your TeamViewer Raspberry Pi Setup
- Security Best Practices for TeamViewer Raspberry Pi
- TeamViewer Raspberry Pi: The Future of Remote Access
- Conclusion